Simple Slony-I Replication Setup.
Published on Mon, Jul 2, 2012
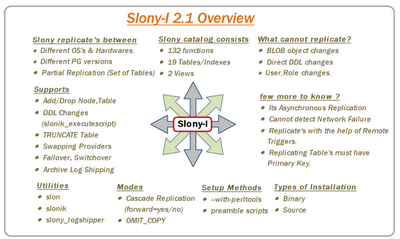
Above shown is an overview about Slony-I Asynchronous replication in short. For more information,Slony-I documentation is your best friend :).
Let’s start with replication methods, in perltools method,you need to configure slony at the time of source installation to enable built-in perl scripts. These scripts start with “SLONIK_” and they are designed to carry replication administrative tasks.
My demo for two methods shell(slonik) & Perl is on Localhost Single
instance(5432) with two databases Master & Slave replicating one table
“rep_table”. For replication, master/Slave should hold same table
structure. If you have many tables use pg_dump/pg_restore structure
dump option. Since am replicating one table I just created the same on
Master/Slave.
Note: Set environment variables like PGDATA,PGPORT,PGHOST,PGPASSWORD &
PGUSER.
Source Installation:
Download the Slony-I 2.1 source(http://slony.info/downloads/)

#bunzip2 slony1-2.1.0.tar.bz2
#tar -xvf slony1-2.1.0.tar
# cd slony1-2.1.0
#./configure --prefix=/opt/PostgreSQL/9.1/bin
             --with-pgconfigdir=/opt/PostgreSQL/9.1/bin
             --with-perltools=/opt/PostgreSQL/9.1/bin
             // Exclude --with-perltools if not needed
# make
# make install
Basic setup on Master/Slave
createdb -p 5432 master
createdb -p 5432 slave

psql -p 5432 -d master -c "create table rep_table(id int primary key);"
psql -p 5432 -d slave -c "create table rep_table(id int primary key);"

Insert some data on master to replicate to slave
psql -p 5432 -d master -c "insert into rep_table values(generate_series(1,10));"
Method 1: –with-perltools :
-
Create on standard .conf file, with information like, Log location, No. of Nodes, Set of Tables etc.,
$CLUSTER_NAME = ‘myrep’; $LOGDIR = ‘/opt/PostgreSQL/9.1/slonylogs’; $MASTERNODE = 1; $DEBUGLEVEL = 2;
&add_node(node => 1,host => ‘localhost’,dbname => ‘master’,port => 5432,user => ‘postgres’,password => ‘postgres’); &add_node(node => 2,host => ‘localhost’,dbname => ‘slave’,port => 5433,user => ‘postgres’,password => ‘postgres’);
$SLONY_SETS = { “set1” => { “set_id” => 1, “table_id” => 1, “pkeyedtables” => [rep_table,], }, };
Initialize, Create-set & subscribe-set, these are the three phases of slony replication. For each phase, “slonik_” perl scripts are created in the location mentioned at the time of source installation with option “–with-perltools”. In my case its, “/opt/PostgreSQL/9.1/bin”. Above CONF file is used in all phases.
-
Initialize the cluster. Here slonik, cross-checks the nodes connection.
cd /opt/PostgreSQL/9.1/bin ./slonik_init_cluster -c slon.conf ./slonik_init_cluster -c slon.conf| ./slonik
-
Create a set, means which set of tables to replicate from Node 1 to Node 2.
./slonik_create_set -c slon.conf 1 ./slonik_create_set -c slon.conf 1|./slonik
-
Start Slon daemons. Each node will have two slon process to carry work. Each node slon process should be started.
./slon_start -c slon.conf 1 ./slon_start -c slon.conf 2
-
Subscribe Set, from here slony maintains data consistency between two nodes by allowing Master for all DML’s and Denying them on Slave.
./slonik_subscribe_set -c slon.conf 1 2 ./slonik_subscribe_set -c slon.conf 1 2|./slonik
After the above steps now your slave will have replicated data.
Method 2: With standard scripts:
In Standard script methods, there are many way to implement, but to understand clearly I have split as same as Perl we did above like Initialize, create-set & subscribe set. All scripts are binded with SLONIK command.
-
Create two .conf files for Master & Slave Node.
vi master_slon.conf cluster_name=myrep pid_file='/opt/PostgreSQL/9.1/data/master_slon.pid' conn_info=‘host=localhost dbname=master user=postgres port=5432’
vi slave_slon.conf cluster_name=myrep pid_file='/opt/PostgreSQL/9.1/data/slave_slon.pid' conn_info=‘host=localhost dbname=slave1 user=postgres port=5432’
-
Initialize the cluster.
#!/bin/bash
Initialize Cluster (init_cluster.sh)
slonik «eof cluster name = myrep; node 1 admin conninfo=‘host=127.0.0.1 dbname=master user=postgres port=5432’; node 2 admin conninfo=‘host=127.0.0.1 dbname=slave1 user=postgres port=5432’;
#Add Node init cluster (id = 1, comment = ‘Primary Node For the Slave postgres’); store node (id = 2, event node = 1, comment = ‘Slave Node For The Primary postgres’);
#Setting Store Paths … echo ‘Stored all nodes in the slony catalogs’; store path(server = 1, client = 2, conninfo=‘host=127.0.0.1 dbname=master user=postgres port=5432’); store path(server = 2, client = 1, conninfo=‘host=127.0.0.1 dbname=slave1 user=postgres port=5432’); eof
$./init_cluster.sh
-
Create a set.
#!/bin/bash
Create Set for set of tables (create-set.sh)
slonik «eof cluster name = myrep; node 1 admin conninfo=‘host=127.0.0.1 dbname=master user=postgres port=5432’; node 2 admin conninfo=‘host=127.0.0.1 dbname=slave1 user=postgres port=5432’;
try { create set (id = 1 ,origin = 1 , comment = ‘Set for public’); } on error { echo ‘Could not create set1’; exit 1;}
set add table (set id = 1 , origin = 1, id = 1, full qualified name = ‘public.rep_table1’, comment = ‘Table action with primary key’); eof
$./create-set.sh
-
To start Slon daemons, use custom script which comes along with source tarbal under “/tools” location “start_slon.sh”. Modify the script by changing .conf file locations for Master/slave startup scripts. This script will give flexibility to use and track all slon process with the help of PID’s mentioned in .conf file.
Usage: ./master_start_slon.sh [start|stop|status]
-bash-4.1$ ./master_start_slon.sh start -bash-4.1$ ./slave_start_slon.sh start
Sample STATUS output:
-bash-4.1$ ./master_start_slon.sh status
Slony Config File : /opt/PostgreSQL/9.1/slony_scripts/bash_slony/master_slon.conf Slony Bin Path : /opt/PostgreSQL/9.1/bin Slony Running Status : Running… Slony Running (M)PID : 28487
-
Subscribe set.
#!/bin/bash
Subscribe Set (subscribe-set.sh)
slonik «eof cluster name = myrep; node 1 admin conninfo=‘host=127.0.0.1 dbname=master user=postgres port=5432’; node 2 admin conninfo=‘host=127.0.0.1 dbname=slave1 user=postgres port=5432’;
try { subscribe set (id = 1, provider = 1 , receiver = 2, forward = yes, omit copy = false); } on error { exit 1; } echo ‘Subscribed nodes to set 1’; eof
$./subscribe-set.sh
Now your slave database will have replicated data in “rep_table”
table.
These two methods will help to understand the basic setup of slony
replication. Will be back with more advanced slony concepts.
–Raghav